AviSynth Script editor with
|
A Media Player / Viewer
|
GUI Video Editor
|
More
|
This guide avoids any discussion of script writing accept as it may pertain to using the features of FilmCutter. Sorry but you must trust me when I say, learn script witting from someone else.
![]() Start learning at AviSynth.org.
Start learning at AviSynth.org.
|
FilmCutter is a tool. My take or twist on doing this stuff.
Title bars are a waste of space. Useful? Yes, but the status bar at the bottom of FilmCutter's window can do more. Menu bars, except that most everyone knows what they are for, are absolutely a waste of space and often time. It is not the normal stuff the makes menus a waste it's the seldom used stuff. I love the pop-up, context menus seen in many programs(now we are talking useful). Toolbars are nice too, but really waste space when used with menu bars. Staring at the top then moving clockwise, let me bore you with some details. |
ToolBarAllows for the smallest number
of mouse clicks to get something done. It has the common things,
Open, Save, Cut, Paste, and some program specific things like preview,
script output properties(at any time press the
Tool ButtonsDown the right side of the program are six user programmable buttons. Once programmed they appear showing the selected application's icon. The details are shown below "Tool Buttons". Status BarStandard type status bar provides file names and the left cell shows what mode or view your seeing. Other messages are displayed when appropriate. Script EditorBig white window in the middle. Left side has a numbered margin which automatically tracks your line numbers(future versions may allow the user to disable this). It is a text editor. Need more look below. Main Window FrameOther than housing the other windows it allows the user access to an overall program menu and a method for moving the window around the desktop (holding the mouse button while pointer is over the frame, allows you to move the window, just like the title bar). Pop-up MenusWhere? Under your other finger. Right handed people do most of their clicking with the left mouse button, left handers use the right, whichever you are the one you don't click things with I call the other mouse button and I shall continue throughout these pages to call it the other mouse button, so use it. This allows the menus to be tailored for the work being done and allows me to provide a dialog short cut. Other click the edit window and you get a menu, other click a tool button and you get a dialog for setting up the button. So if you see it, other click it. |
Script Editor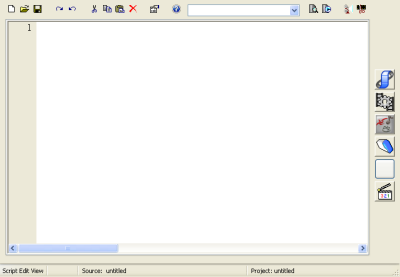 |
Script Preview |
Video Editor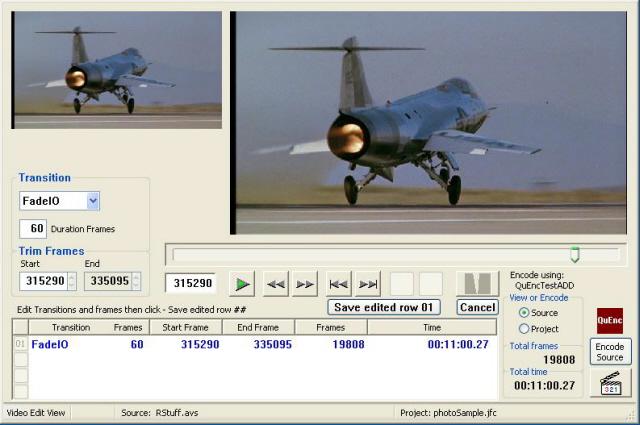 |
Media Viewer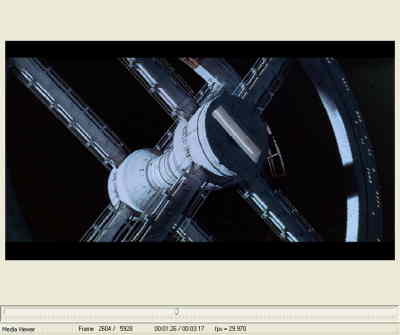 |
 |
Navigating the different modes is done by menu, toolbar button or F key. The second view, Script Preview, is only accessible from the Script editor, view one. Once using the script preview mode the only way back is though the script editor, view one. |
Semi-independent use of the video player allows viewing other scripts, bitmaps, mpegs, jpegs, audio and saving frames to bitmaps.
Using FilmCutter's scene editor, cut out unwanted material fast, add fades and dissolves.
This guide also has information about FilmCutter's command line encoder interface and internal Save Wave functions.
|
|
Save Wave feature |
In order to use AviSynth or avsFilmCutter you need a script. With the mouse pointer over any part of the editor window click the right mouse button and select open script or just start typing. Almost all scripts will contain a source function and some filters.
AviSource("your file.avi")
Most would agree that the above represents a script. Normally there would be more functions or statements describing filters which resize or perform color space conversion, trim off some frames and maybe repeat some.
We have a usable script, what to do with it? With text editors you will need to save your script before you can do anything with it. FilmCutter allows you to do somethings to the data displayed in the window.
With a saved script you may
The script editor mode has a tool bar for common functions like New, Open, Save. The tool-bar has tool tips, with "normal tool tips" enabled and FilmCutter will explain each button.
Now that we have a script, from the menu select "PreView Script" or "Play Script" or press the F5 or F6 key. The view will change to a preview window and show frame 0 of your video or begin to play as you have chosen. Grab the button on the track bar and drag back and forth to move quickly though your video or let it play. F6 will play/stop the viewer, F5 will return to the script editor or you can return using a view selection in the menus.
You have two preview modes "Standard" and "w/Script Editor" also beneath the video window are two buttons for advancing and reversing single frames, a frame counter and a jump to frame window (type in a frame number and hit enter). Once you have advanced the frames into the video switching back and forth between the "Script Editor" and "PreView" will not change the frame displayed. With this if your trying to tweak the color just right you can stay on one frame. There is a but, an editing mistake that causes an error will zero the counter and of course some filters and functions change the total number of frames. But why switch back to the "Script Editor" select "w/Script Editor" and do it all in one window. There is an "Info" option in the preview options that can be checked to display your script's video and audio output properties each time you update the viewer with the changes to your script.
You need not save your script as you write to view it. Check the status bar at the bottom of the main window and note that your viewing either your source script or windat.avs, windat.avs being the contents of the edit window.
Back at the script edit window select "save script" from the menu to save your work. Now you have a source script. At anytime during your script writing pressing F8 will display your script's output properties.
Now let us consider the above script a little simple, but like me you can never remember exactly how those filter functions are used. FilmCutter can help now, click the down arrow on the list box in the tool bar at the top of the window just to the right of the question mark. A drop-down window will appear with a list of all internal and installed plug-in functions (this feature is AviSynth version dependent, see below). Alternately you may press CTRL+ENTER to open and then close the window. Select your filter or function using the wheel on your mouse, the scroll bar or the up down arrow keys. To finalise your selection click on the highlighted word, press ENTER or the TAB key. Clicking on the desired function or pressing ENTER closes the list window and inserts the filter or function keyword where the curser was, when TAB is pressed a parameter dialog window opens to help you remember the multiple function arguments from filters like Depan or ColorYUV (lots of parameters), once you have provide the parameters click ENTER of press ENTER on the keyboard and the entire function and parameter list will be inserted into your script.
Another feature is much like an auto-complete engine. As you type FilmCutter compares your typed text, starting with two characters, against the list of functions gathered from avisynth, the first match is shown in the list window on the toolbar and a popup window reminding you about the use of the arrow keys or you may continue typing the whole word. At anytime before the word is completed you can press SHIFT+ENTER to insert the word or just press ENTER to open the filter / function parameter dialog window. As you type the first word matching your typing will show until the last charactor of an exact match, below is an example.
You begin typing "apply", when you press the "y" key the little helper box goes away. You want applyrange, just press the "r" and the little window will reappear. If you have had syntax highlighting enabled the apply would have turned green when the "y" was typed, when you add the r the text returns to black.
Backspace if you make a mistake. Every time you type a character FilmCutter checks the partial word behind the caret. This little goodie will not keep you away from the AviSynth and plug-in documentation but it might make it a little easier.
Starting with version 2.55 of AviSynth, avisynth.dll reports both the plug-ins function name and it's alternate name. In other words functions such as Mpeg2Source will have more than one name. In the filter / function list you will find both Mpeg2Source and DGDecode_Mpeg2Source listed. This means that all externals / plug-in function names are listed twice, this issue is on the list and is not that difficult to deal with except that it gives me a headache and from a cold start gathering the filter names makes FilmCutter seem slow to start now.
avsFilmCutter supports all versions of AviSynth that provide this filter / function information starting with 2.52
You already have a script editor you like, add it to a tool button and use it.
FilmCutter has tool buttons for launching your favorite programs like a script editor written for AviSynth, AVSEdit is a very competent avs editor and has been the one I use, although there are others like VirtualDubMod. FilmCutter can launch the tool opening your saved source script and reload the edited script once you have added noise filters color correction and all the wondrous things AviSynth can do.
Setting up a tool button is easy, right click the button or click on an blank one and a button setup dialog box will appear. Click the button and select the tool. When you return from the file lookup dialog the name of your tool should appear and it's icon will display in the button. The default command line (%filename) which is sent to the tool when launched is also shown.
The command line contains the info or arguments sent to the tool when the tool is launched or started. The program starts and then does what is in the command line. The "%filename" represents the file save as your source script. If you wish to use a program like DGIndex in your tool bar delete the %filename before clicking the OK button in the button setup dialog box.
Tool button 6 functions in the same way as the other tool buttons except that it acts as the internal preview does sending the source script if save or unmodified. Or the contents of the edit window by means of windat.avs.
Now we should have a working script only thing left to do is encode.
You may save the audio from your scripts to a standard wave file. Files up to 4 gig can be created. You may save multi-channel audio 6 max (this version) or save as six individual files. Save Wave As can be found in the script editor's and main window's pop-up menus. Future versions will more than likely support extensible wave formats and more.
Pressing F7 will launch your source script into the encoder of your choice. The encoder setup dialog works much the way the tool button dialog does, except you can create a list of encoders and select from this list an encoder you have already configured. Click the button next to the "Delete button" to add an encoder then edit the command line or select one you have already done from the list box. Either new or from the list the encoder named in the list window will become the default encoder.
The encoder command line differs from the tool buttons command line, examine the following example.
" -i %filename -o %ofilename "
| -i | is the input switch |
| %filename | represents your script |
| -o | is the output switch |
| %ofile.??? | represents your desired output filename from the encoder (FilmCutter will ask before the encoder is launched). |
While FilmCutter will still accept "%ofilename"(which defaults to ".mpg"), the outfile marker "%ofilename" has been changed to "%ofile.???" allowing the user to tell FilmCutter what output extension to use for the encoder. HC only produces mpeg-2 video streams so use "%ofile.m2v". QuEnc can output m2v, mpg, ac3, mp2 or m1v. FilmCutter allows 99 encoder setups so if we name one "QuDolbyAudio", we can use "%ofile.ac3".
For more information regarding FilmCutter's encoder interface see:
Encoding from avsFilmCutter
We can write, open and save script files. Jump out to other tools to enhance our scripts. Preview and tweak our scripts internally and externally then encode our video without closing FilmCutter or leaving the script editor window of the program.
FilmCutter does not sit between your script and any external program you use. If your script will not encode check the script. FilmCutter accepts all color spaces you have an installed decoders for, whereas some encoders like HC and QuEnc only accept YV12. FilmCutter can if you specify so in the encoder setup dialog, check your script for output color space (pixel type).
This guide was first written following 0.5b and a lot has changed, much has to do with interfacing to AviSynth. I am sure FilmCutter's script editor isn't the best but it is better than it was. At this writing I'm working on version 0.0.2.0 beta which will contain more work on viewing during editing the. One day soon I hope to support multiple sources(multiple cameras). Although I never intended in the beginning to consider FilmCutter a primary script editor, the opportunity has shown itself. FilmCutter is cookie dough and is taking a slightly different shape each version.
Good luck and thank you for your interest in FilmCutter. Feel free
to contact me.

or
avsFilmCutter thread
in the AviSynth usage forum at Doom9.org